Wildlife Monitoring

Discover what’s possible.

Get a complimentary consultation today.

Discover what’s possible.

Get a complimentary consultation today.

Satellite Imagery for Wildlife Monitoring & Tracking

Satellite remote sensing, machine learning (neural networks processing), geographic information systems (GIS), and global positioning systems (GPS) have greatly expanded opportunities for data collection, integration, analysis, modeling, and satellite map production for wildlife monitoring and assessment. High-resolution satellite imagery gives scientists and researchers increasingly up-to-date geospatial data by using neural networks processing, reliable statistics is obtained for monitoring wildlife migrations, habitat mapping, and tracking endangered species in remote areas of the world to assist in management and conservation activities. With spectral signatures collected for wildlife monitoring and utilizing neural networks algorithms, statistics are obtained during the migration of wildlife, counting adult and calf species.  

GeoEye-1 Satellite Map (0.5m)

Wildebeest Migration

Copyright © MAXAR. All rights reserved.

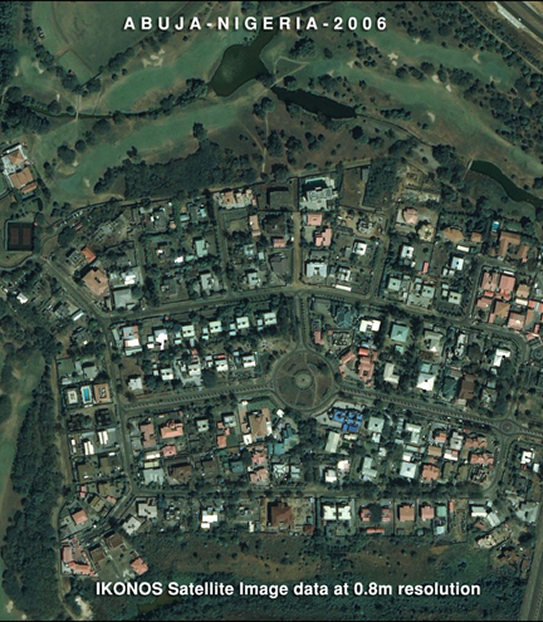
Using high-resolution satellite images and GPS position data, received by collars or tags placed on wildlife, are relayed via communication satellites to scientists and researchers. This technology allows researchers to track wildlife in remote areas of the world. The data collected from GPS and high-resolution satellite imagery allow researchers to identify and monitor wildlife movement, patterns, species numbers, behaviors, and to prevent poaching. By utilizing high-resolution satellite sensors, with revisit times of 2-3 days or by using suitable smallsats, micro, cubic or nano satellites with daily revisit times wildlife can be detected, identified, classified and counted by  AI/ML algorithms, supporting a CV or GIS wildlife management system, covering land and aquatic regions around the world. 

WorldView-3 Satellite Image (0.3m)

Caribou Herd Migration – North Slope of Alaska

Click to view animation.

Copyright ©MAXAR/Processed by Satellite Imaging Corporation. All rights reserved.

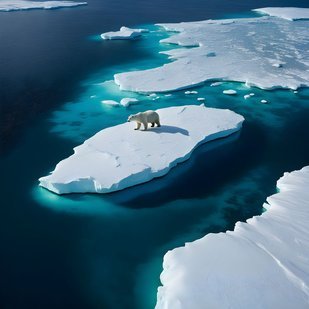
Wildlife threatened by habitat loss, poaching, deforestation, and other factors, many species are declining at an alarming rate. Poaching has escalated in recent years and new technologies have been used to fight wildlife crime.

View article on Satellite Imagery and GIS Technology Improve Wildlife Conservation in Virunga National Parks, Africa

Scientists and researchers have been monitoring wildlife populations for decades, traditional capture by aerial visualization and tag methods have been a primary tool, but they are not the most efficient when dealing with large animals in remote locations. The use of GPS collar locators, high-resolution satellite imagery at 30cm, and the use of mobile apps all aid in wildlife management. The WorldView-3 satellite sensor with a resolution of 30cm panchromatic and 1.2-meter 8-band multispectral is becoming a great resource for wildlife monitoring.  When reliable spectral signatures are available for the wildlife species to be monitored, seasonal statistics can be obtained, through neural network processing, and with high confidence levels.

To understand why and where species are being lost, satellite images offer certain advantages such as watching vast areas of the earth all at once on a regular basis and by making comparisons over time. This provides analysis, assessment, and monitoring of what is happening on the ground which allows researchers and scientists to predict the best areas to protect and manage.

Species are critically declining and facing extinction due to agriculture, climate change, construction, wildfires, droughts, exploitation, and exotic collections. Habitats from forests to our oceans, grasslands,deserts, and wetlands are experiencing decay, and destruction from human activity, and climate change. With the technology of satellite remote sensing, GPS, GIS, and unnmaned aerial vehicles (UAV) researchers and conservationists have the capability to monitor and manage wildlife and their habitats to support conservation.

Wildlife Conservation Presentation

Click to view the presentation

Ready to get started?

Contact us for a custom imagery solution or request a quote

TESTIMONIALS

Stories & Experiences

Lorem ipsum dolor sit amet, consectetur adipiscing elit, sed do eiusmod tempor incididunt ut labore et dolore magna aliqua. Ut enim ad minim veniam, quis nostrud exercitation. .

FAQ’S

Frequently Asked Questions

How to find Geographic Coordinates in Google maps?

To find geographic coordinates in Google Maps, you can follow these steps:

  1. Open Google Maps in your web browser or on your mobile device.

  2. Search for the location you want to find the geographic coordinates for by entering the address, landmark, or name of the place in the search bar at the top of the page.

  3. Once the location is displayed on the map, right-click (or long-press on mobile) the exact point on the map where you want to find the coordinates. This will open a small menu.

  4. In the menu that appears, click on “What’s here?” or “What’s here? – Coordinates” option. On mobile devices, you may need to tap on the location marker first to reveal the menu options.

  5. A small information box will appear at the bottom of the screen, displaying the latitude and longitude coordinates of the selected point. The coordinates will be shown in decimal degrees format.

  6. You can click on the coordinates in the information box to expand it and see the coordinates in different formats, such as degrees, minutes, and seconds (DMS) or Universal Transverse Mercator (UTM) format.

To create a KML (Keyhole Markup Language) file in Google Earth, you can follow these steps:

  1. Download Google Earth Pro and Open on your computer.

  2. Navigate to the location or area you want to create a KML file for by using the search bar, zooming in/out, and panning on the map.

  3. Customize the view and layers in Google Earth Pro to include the specific data or elements you want to include in your KML file. This can include placemarks, paths, polygons, overlays, images, and more.

  4. Once you have set up the desired view and layers, go to the “Add” menu at the top of the screen and select the type of element you want to add (e.g., placemark, path, polygon, image overlay).

  5. Follow the prompts to add the specific element and provide the necessary information, such as location coordinates, name, description, and any additional properties or styling options.

  6. Repeat the previous step if you want to add more elements to your KML file.

  7. After adding all the desired elements, go to the “File” menu and select “Save Place As.”

  8. In the “Save Place As” dialog box, choose a location on your computer where you want to save the KML file.

  9. Specify the name of the KML file, ensuring it has the .kml extension (e.g., myfile.kmL), you may need to select KML as GoogleEarth defaults to KMZ formats.

  10.  Click the “Save” button to save the KMZ file to the specified location on your computer.

Ordering commercial high-resolution and medium-resolution satellite maps process:

  1. Identify your requirements: Determine the specific needs for the satellite maps, including the desired resolution, geographic coverage, acquisition date, and any additional specifications such as spectral bands or cloud cover constraints.

  2. Contact Us: Reach out to us to inquire about our imaging product and services. Provide us with the details of your requirements, including the area of interest, resolution, and any other specifications.

  3. If there is high urgency for imagery, please let us know that this is a time sensitive project. Any project deadlines should be included with your initial contact.

  4. Request a quote: Ask for a formal quote for the satellite maps you need. The quote should include information such as the cost, delivery timeline, licensing terms, and any additional services like data processing or analysis.

  5. Review the quote: Evaluate the quote provided by us and if needed, we can negotiate the terms, pricing, or any specific requirements that may not be fully covered.

  6. Confirm the order: Once you are satisfied with the quote and have reached an agreement, confirm your order. We will guide you through the necessary steps for payment and delivery.

  7. Receive the satellite maps: After the order is confirmed and payment is processed, you will receive the satellite map data in the specified format. This may include downloading the data from a secure portal or receiving physical media, depending on delivery method.

  8. Utilize the satellite maps: With the satellite maps that you receive, you can utilize it for your intended purposes, such as GIS data, 3D terrain maps, disaster, geospatial data, and other applications as needed.

Satellite map raw files refer to the unprocessed and unedited data captured by satellite sensors. These files contain the raw data received by the satellite sensors, including the reflected or emitted electromagnetic radiation from the Earth’s surface.

Satellite map raw files typically come in specialized formats specific to each satellite sensor or provider. These formats may include formats like GeoTIFF (georeferenced Tagged Image File Format) or ENVI (Environment for Visualizing Images). The raw files preserve the original sensor readings, which can include various spectral bands, radiometric information, and geometric parameters.

Raw files require processing to convert them into usable formats, such as georeferenced images or digital elevation model(DEM). Processing steps may involve radiometric and geometric corrections, atmospheric compensation, calibration, orthorectification, and mosaicking, among others.

Once processed, raw files can provide valuable information for various GIS data applications, including 3D terrain maps, agriculture production maps, vegetation maps, and disaster maps.

To download satellite maps from an FTP (File Transfer Protocol) server, you can follow these general steps:

  1. Obtain the FTP server information: Get the FTP server details from the satellite maps provider or the source you are accessing. This includes the FTP server address, username, password, and potentially the directory path to the imagery files.

  2. Choose an FTP client: Select an FTP client software or application that allows you to connect to the FTP server and perform file transfers. Some popular options include FileZilla, WinSCP, Cyberduck, or the built-in FTP functionality of certain web browsers.

  3. If you are unable to download an FTP client due to software locks, Windows has a built in FTP Protocol that can be accessed by copying the URL of the FTP server in your Windows File Explorer.

  4. Depending on the method to connect to the FTP, you will need credentials including a Username and Password to access these file.

  5. Most FTP clients will allow you to Copy and Paste or Drag and Drop the files from the client window to your local files.

Remember to comply with any terms and conditions associated with the satellite map data, including usage restrictions, licensing agreements, and any attribution requirements specified by the provider.

For any other questions or for a consultation, please contact us.

Scroll to Top